How to integrate Hasura with Auth0
Step by step guide on how to use Auth0 with Hasura in a Single Page App bootstrapped with Create React App.


Overture
I’ve been struggling to put together the pieces of documentation that you need to have this working properly.
In hindsight, it was an easy-peasy task, but some of the steps are not so straightforward nor sufficiently explained in the projects’ docs.
By the end of this tutorial, you are running a Full Stack app that can signup/login users and persists user data in a backend service.
The Main Characters
Hasura is a real-time GraphQL engine. It sits between your frontend and PostgreSQL database and build up a schema that you can easily query from your frontend project or other services.
Hasura is Open Source and you can run it entirely for free thanks to Docker (locally or on-premise) and Heroku (on the cloud).
Auth0 is a commercial Authentication/Authorization as a Service. It handles all your signup/login logic for you, and it applies top-shelf safety guidelines.
Although Auth0 is not free, they offer a generous free-tier up to 7k users to kick-start your project, and later on, the pricing model is decent. It definitely costs less than maintaining an engineer that focuses on safety!
The Plot
Here is a brief list of the steps that you are going to take in order to get things up and running:
- Setup an Auth0 Account & App
- Setup an Hasura App on Heroku
- Prepare your backend with users and todos endpoints
- Configure Auth0 to sync users with Hasura
- Configure Auth0 to generate an Hasura compatible authentication token (JWT)
Setup an Auth0 Account & App
Head to the Auth0 home page and signup using one of the available social signups.
Once you are in, you need to go through a few configuration steps that set up your first tenant. You can consider a tenant as a bucket of users, give or take, you will use a new tenant for a new project.
Now you are ready to set up your first app:
- Go to “Applications -> Default App -> Quick Start”
- Choose the “Single-Page App -> React” combination
- Follow the tutorial on how to set up your Auth0 App
- Download the demo app and run it to test it
👉 IMPORTANT: Auth0 comes pre-configured with a generic Google login. Although this will work out of the box, you will notice that your app loses the login status at every full-page refresh. This happens because you should fully configure the connection between Google and Auth0 by creating a Google App ID and secret.
This configuration is out of the scope of this tutorial, and I simply suggest using the email/password signup/login. That will work just fine 😀.
Setup an Hasura App on Heroku
This step consists in following the official documentation from the Hasura website:
https://docs.hasura.io/1.0/graphql/manual/getting-started/heroku-simple.html
I feel this is a great quick start experience with the “Deploy to Heroku” button:
- From the documentation page click on “Deploy to Heroku”
- Choose your App’s name and region
- Click on “Deploy App” (wait a minute or two)
- Click on “View App” to open the Hasura dashboard 🤪
Can anything be easier than that?
I don’t think so!
👉 IMPORTANT: After you play around with some basic Hasura introduction tutorials, I strongly suggest you go through the Securing the GraphQL endpoint tutorial.
That’s all Folks! before you move on, I suggest you play around with some basic Hasura tutorials on how to build tables, perform queries and mutations.
Also, you may want to take a read on Hasura’s Authentication and Authorization in order to familiarize yourself with the concept of the JWT token used in the request’s headers. It is not a bad idea to play around with it to the point that you can manually generate a token on jwt.io and use it to perform some user-level queries.
Prepare your backend with Users and Todos endpoints
This step requires you to login into your new Hasura dashboard and prepare your backend to handle:
- User synchronization between Auth0 and Hasura
- User-based queries (aka Hasura authorization on the Todos table)
Prepare the Users
The users’ table will store all the signups and logins.
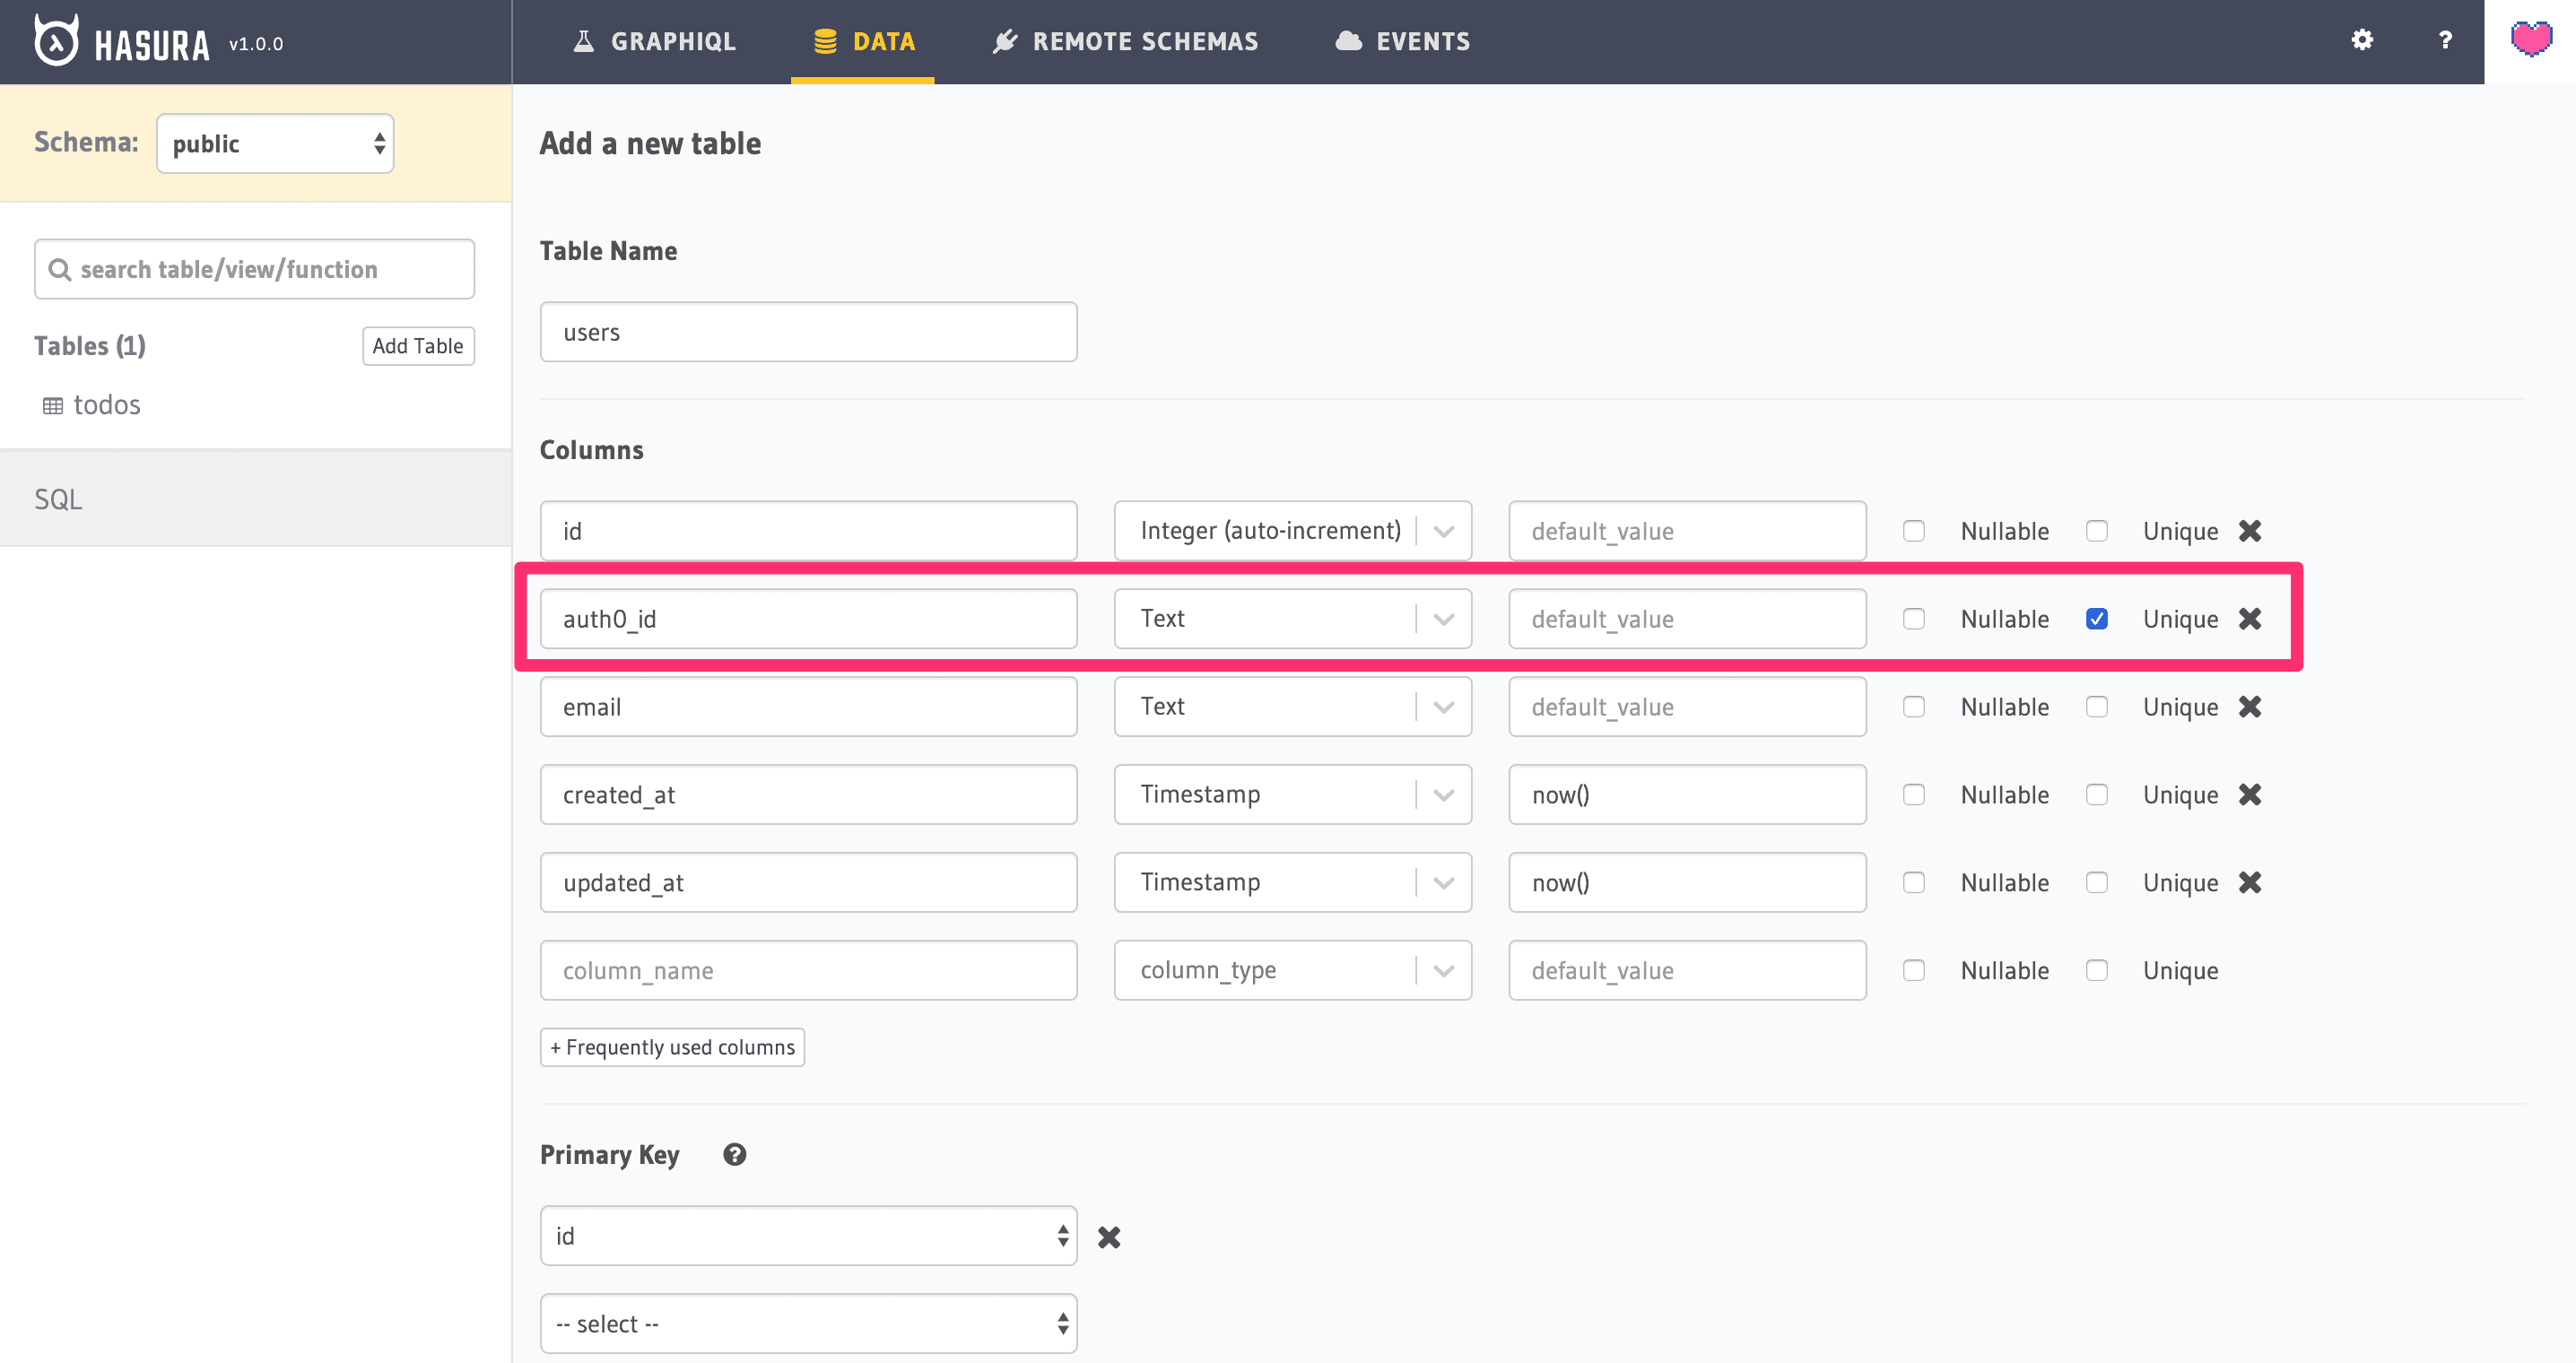
Go to “Data -> Create Table” and create a table named “users”:
- id, integer, auto-increment, primary
- auth0_id, text, unique
- email, text
- created_at, timestamp
- updated_at, timestamp
Prepare the Todos
The todos table will store a list of tasks that need to be performed for each user.
👉 The final goal is to log in as a user and make sure that she can access only her own todos!
Go to “Data -> Create Table” and create a table named “todos”:
- id, integer, auto-increment, primary
- user_id, integer
- text, text
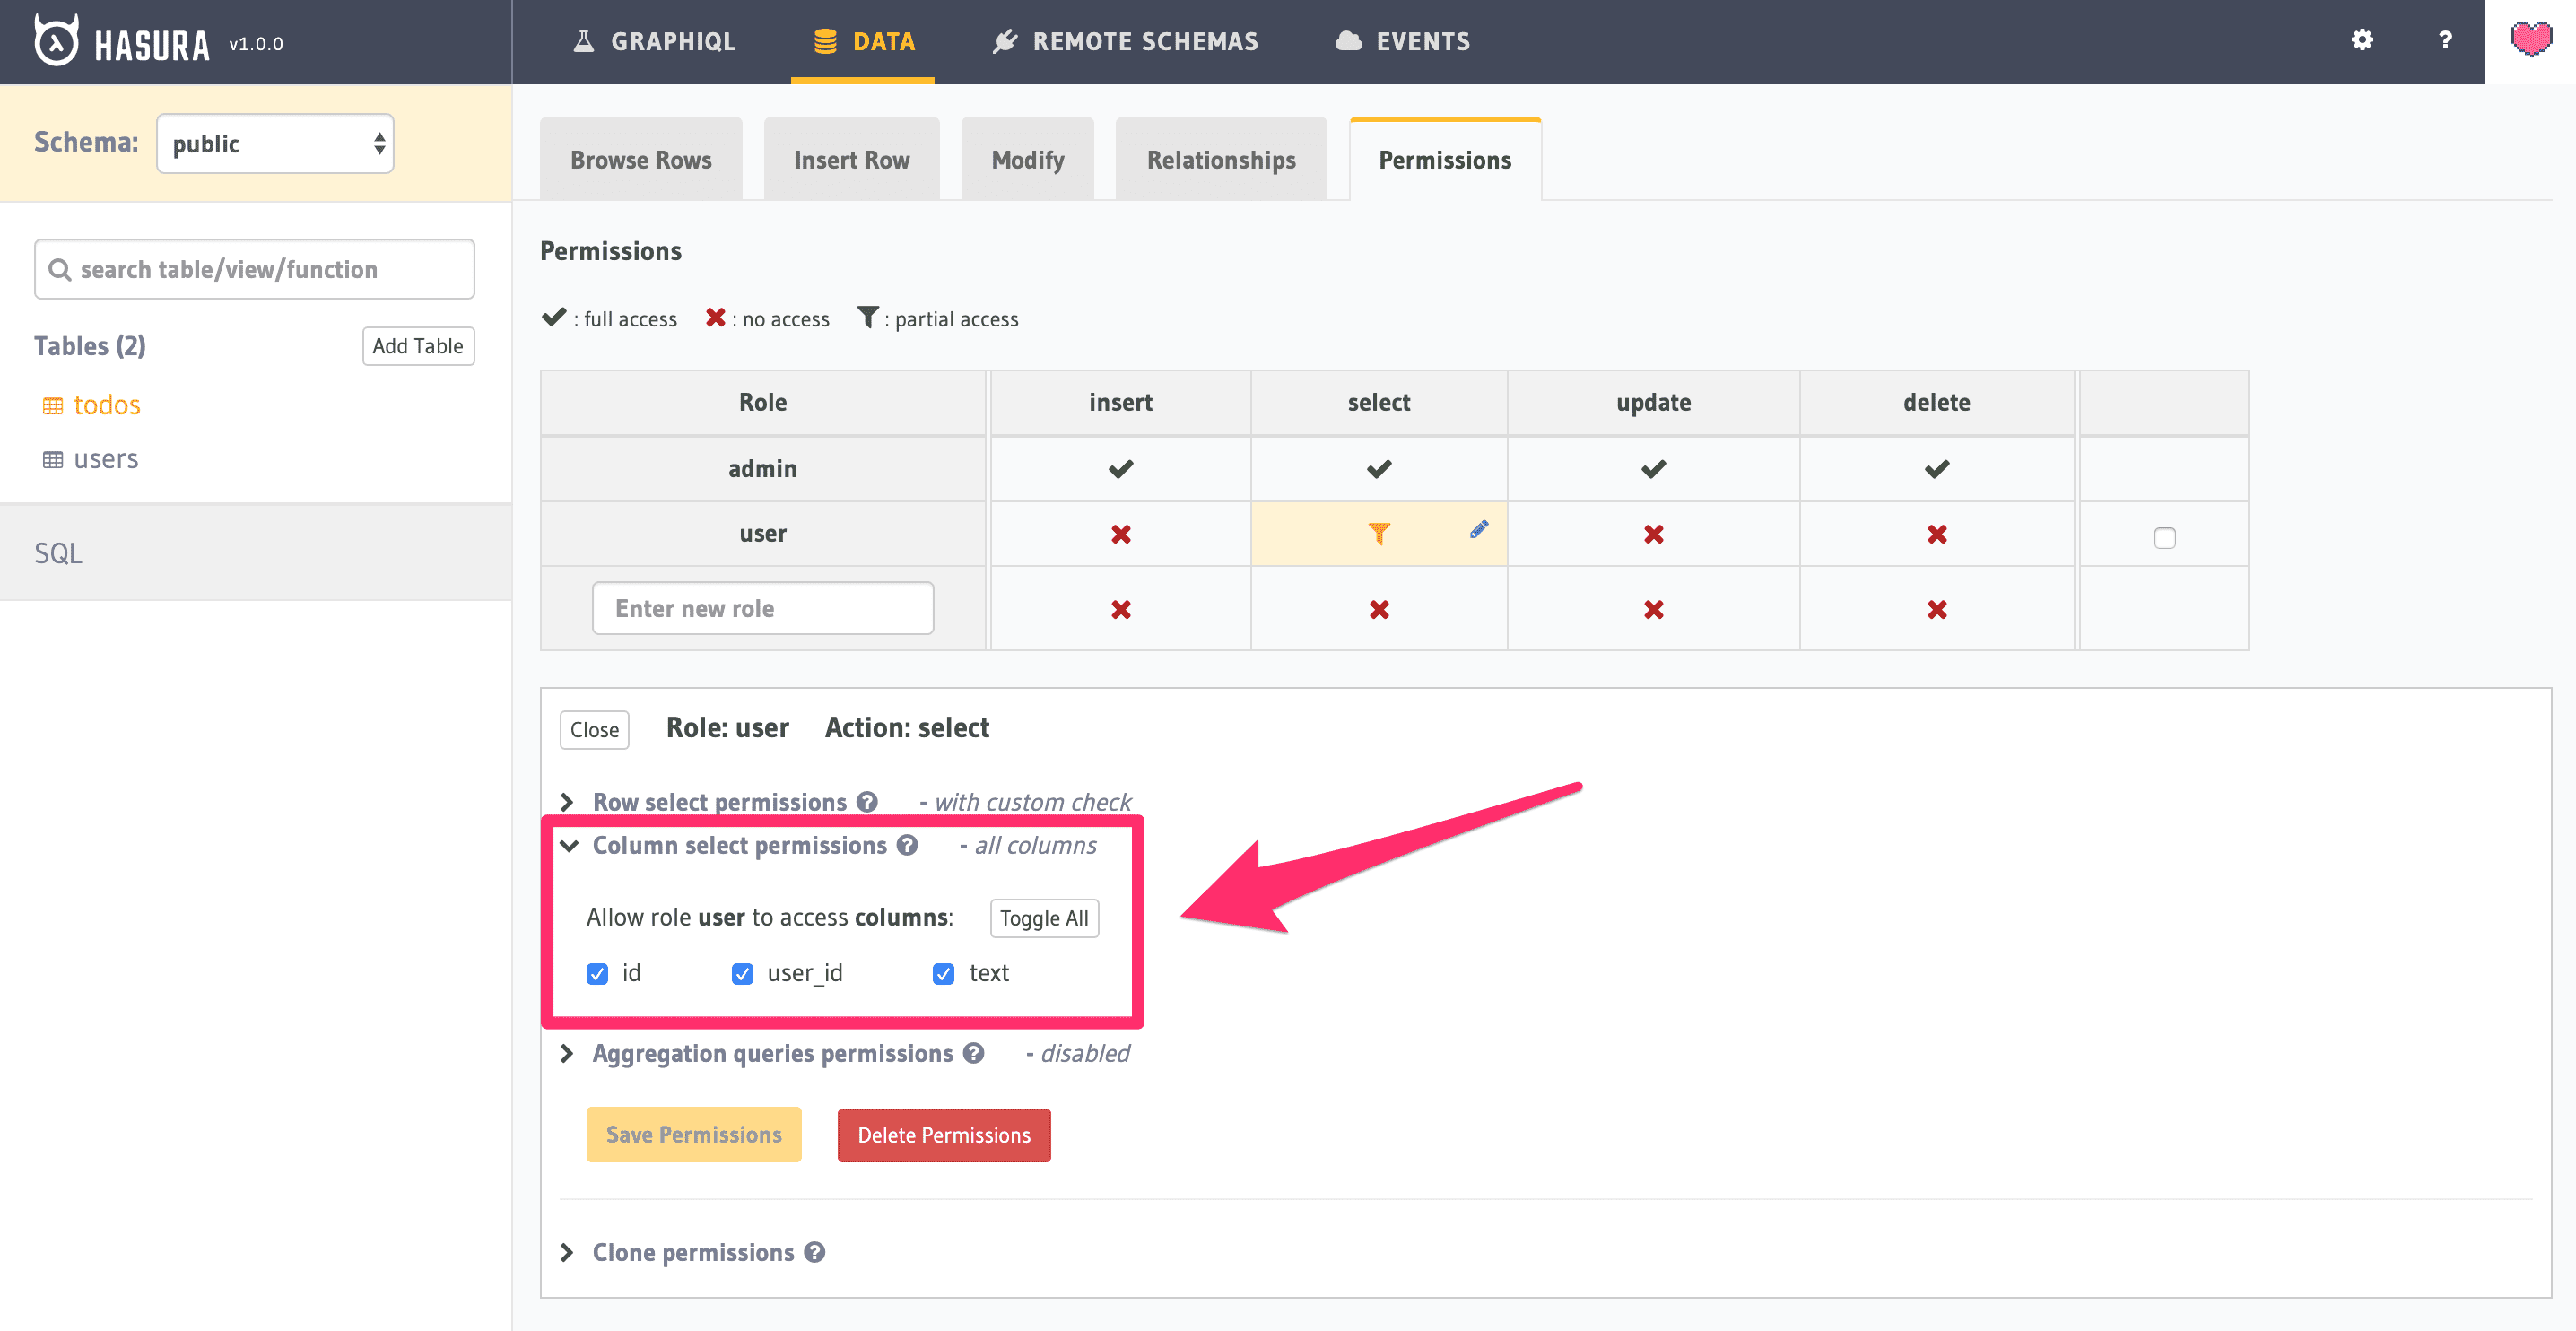
For this table, you are also going to modify the “Permissions” adding a new role and setting it up so as to restrict any SELECT * statement to a sub-group of rows filtered by the user_id:
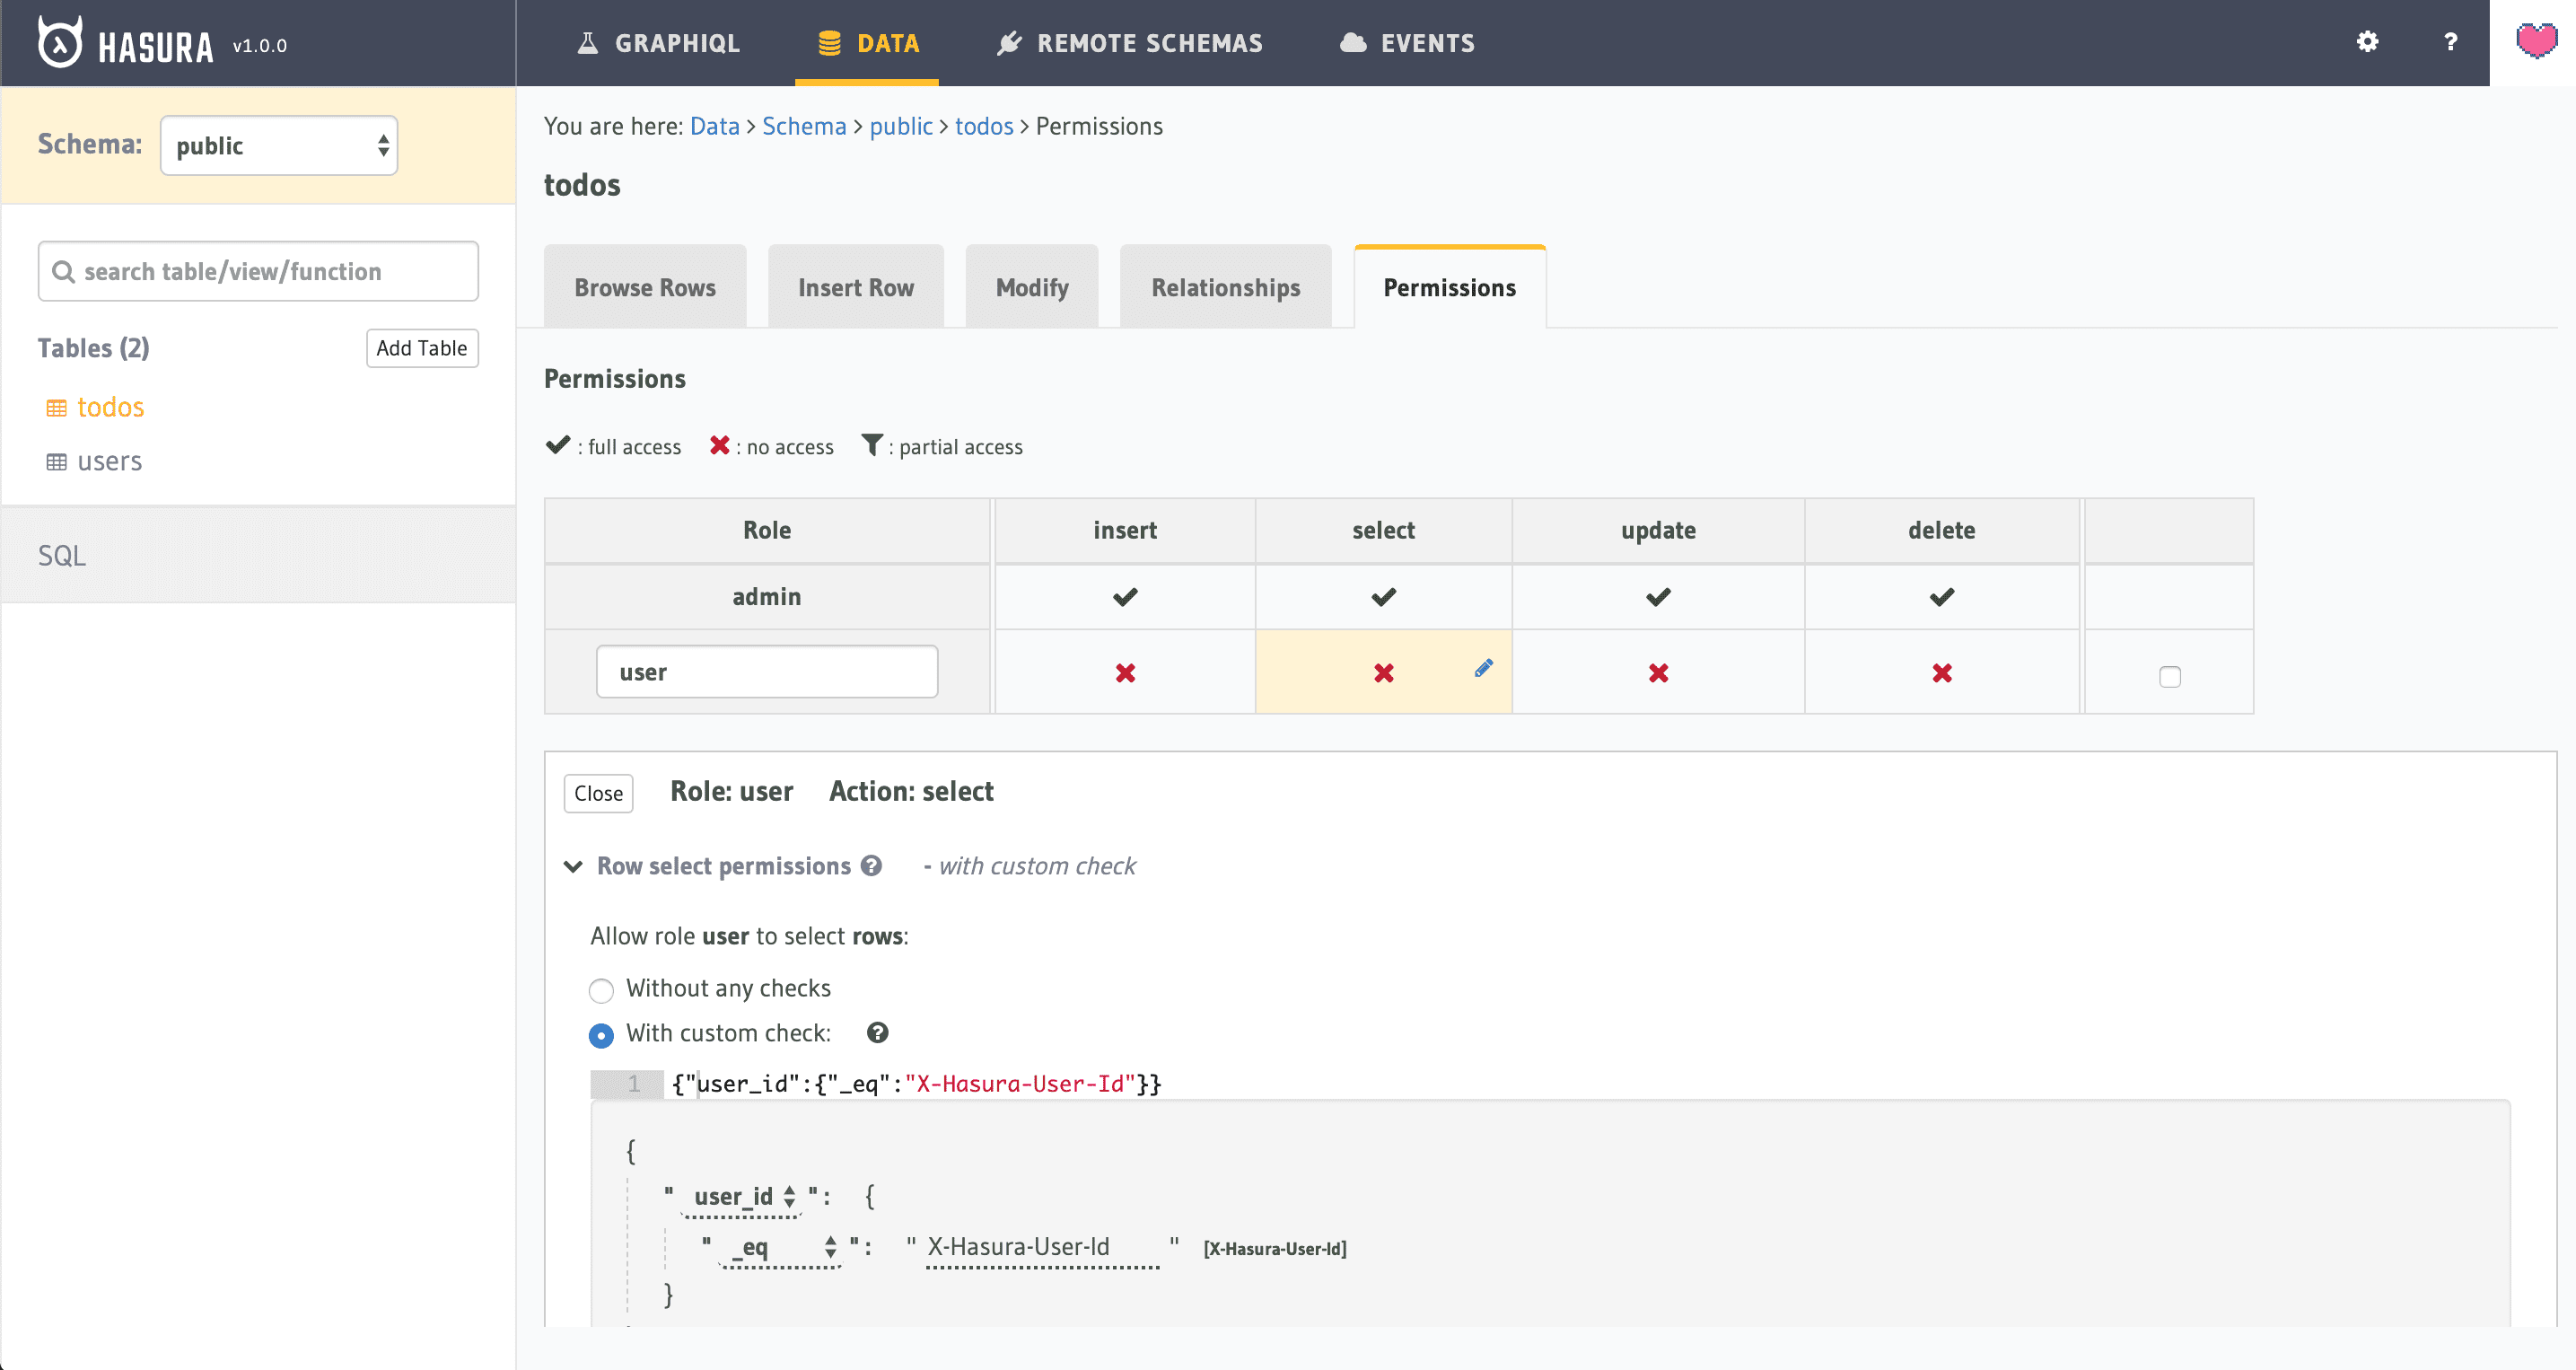
NOTE: be sure that you select all the columns under the “Column select permission” panel:
Test Todos Permissions
In order to verify that the permissions setup works as expected, I suggest you test it out before you proceed any further.
Step 1: add some todos with different user_id values using the “Data -> todos -> Insert Row” utility:
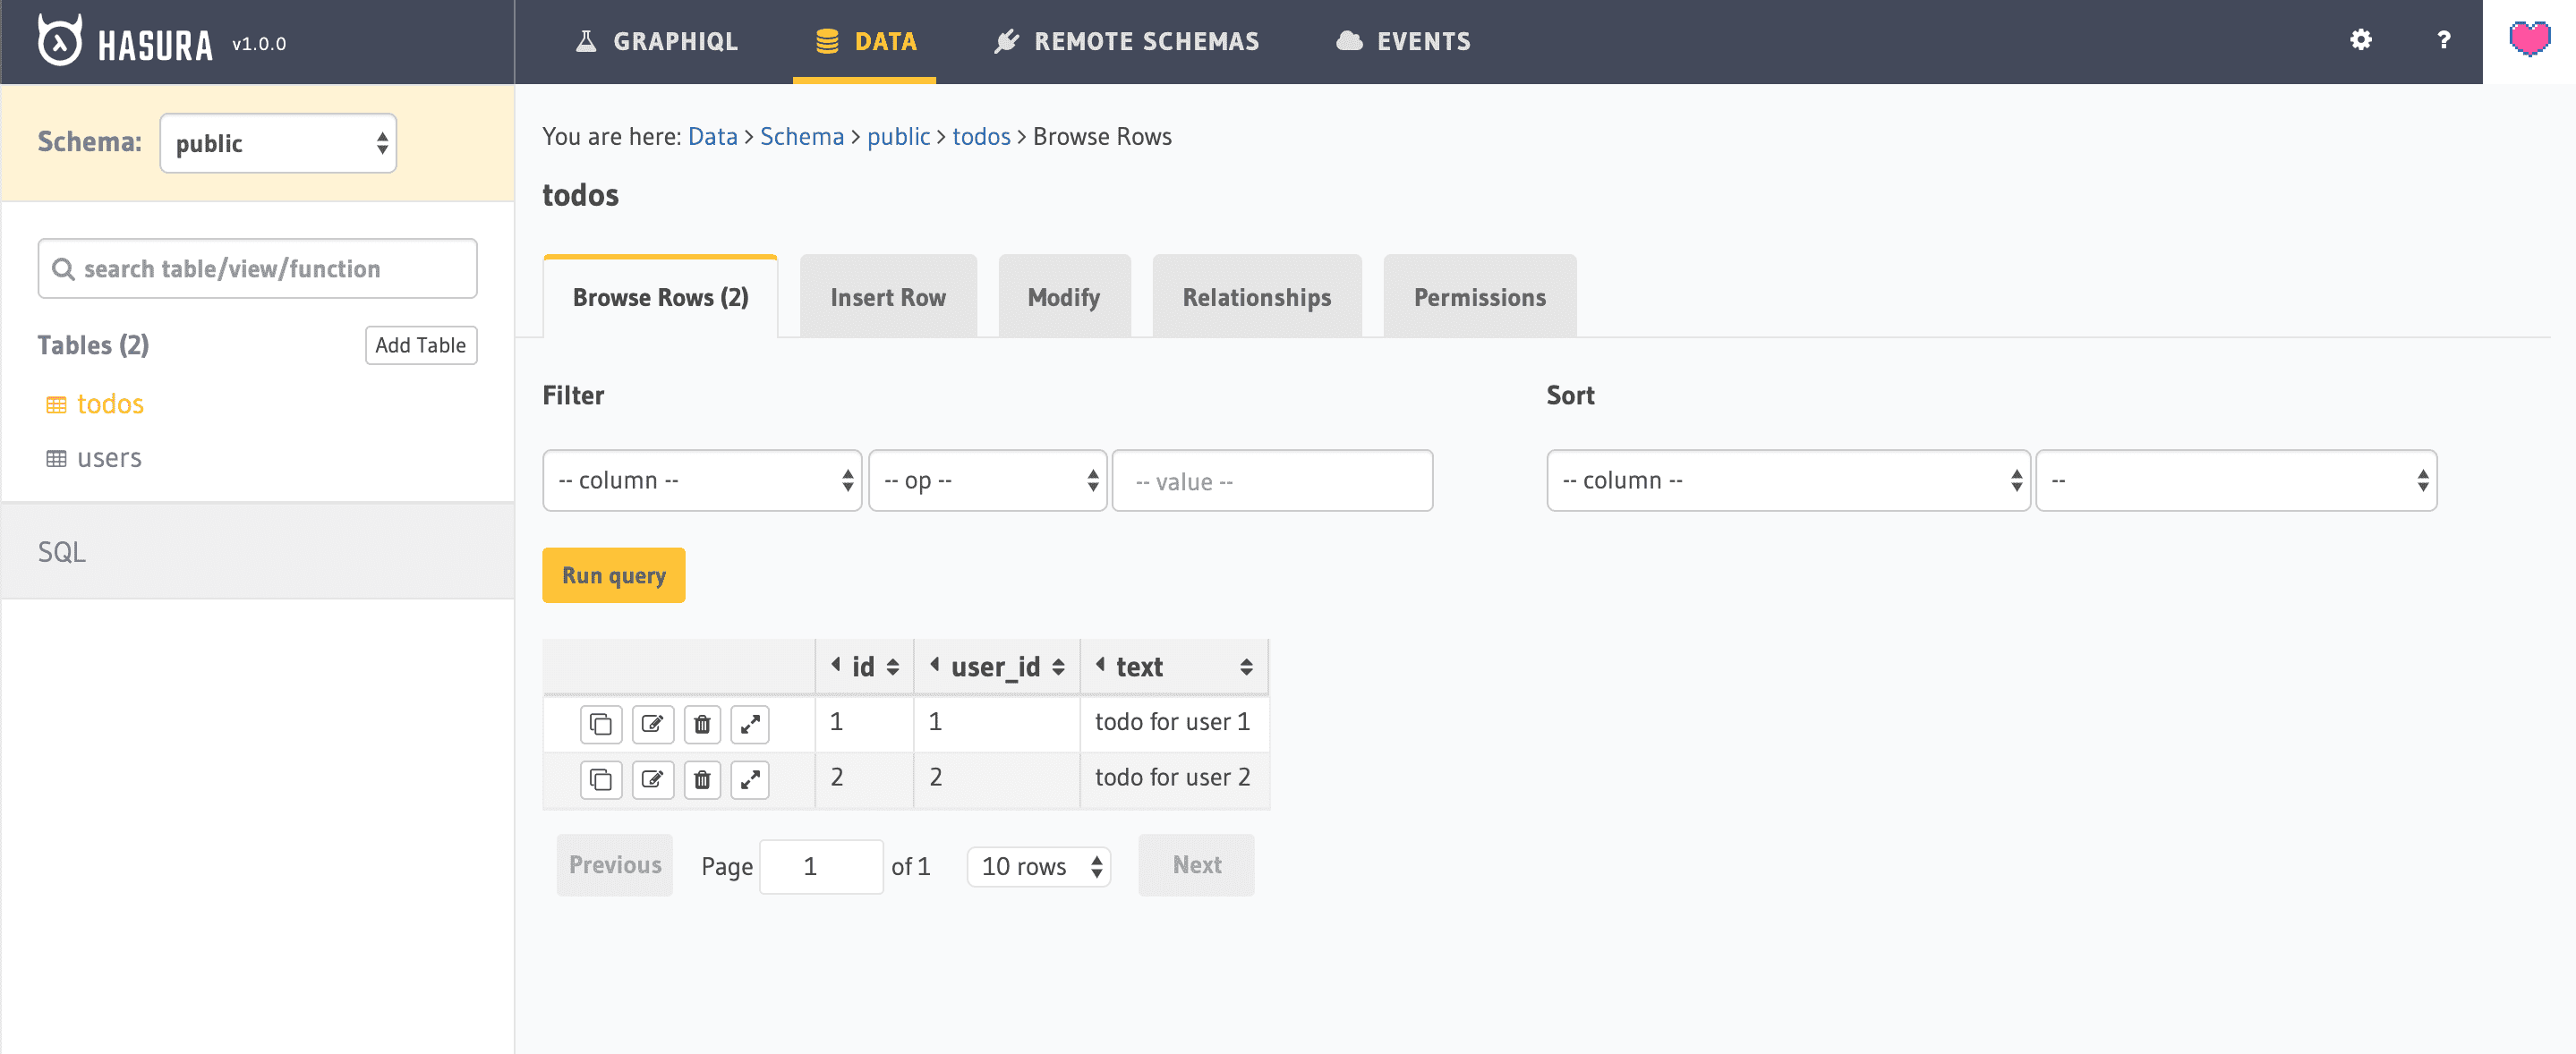
Step 2: simulate a role base query using Hasura’s Graphiql UI:
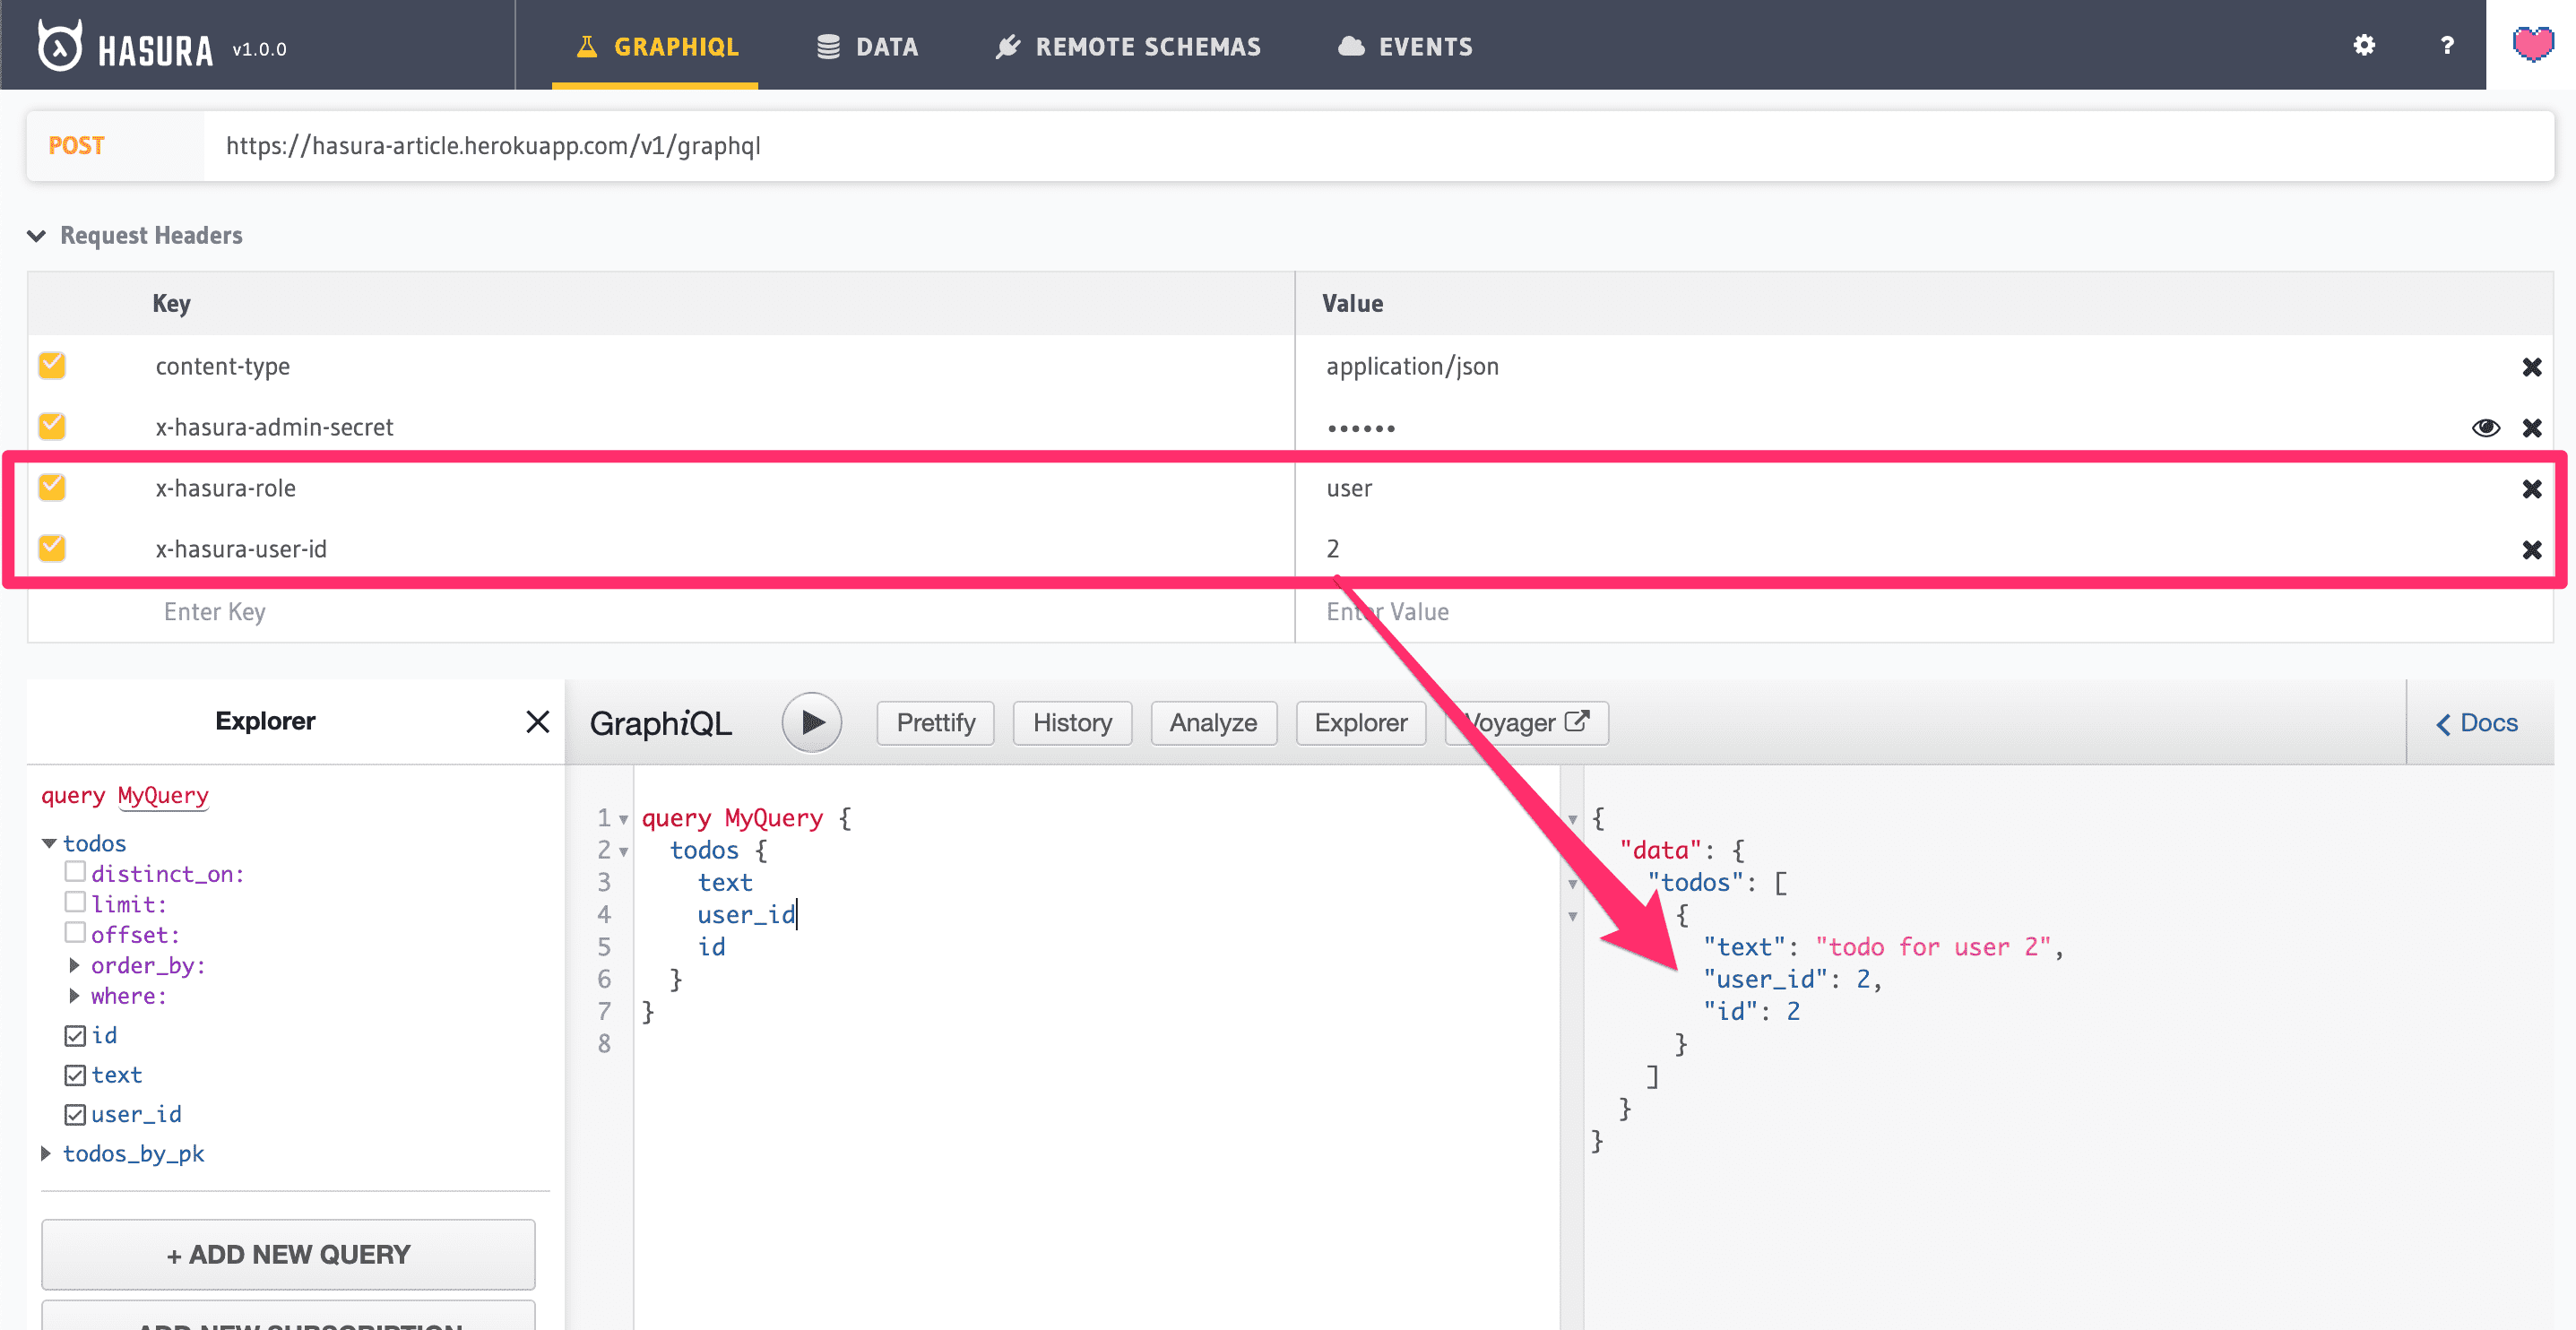
Once everything works as expected, you can move on to the next step.
Configure Auth0 to sync users with Hasura
In this step, you are going to write an Auth0 rule that is capable of syncing data from Auth0 to Hasura’s users’ table every time a user authenticates.
From your Auth0 dashboard head to “Rules -> Create Rule” and select “Empty Rule” as a template, name the rule “sync user to Hasura” and paste the following code into it:
function syncUserToHasura (user, context, callback) {
  const query = `
    mutation($userId: String!, $email: String) {
      insert_users(
        objects: [{
            auth0_id: $userId
            email: $email
        }],
        on_conflict: {
            constraint: users_auth0_id_key,
            update_columns: [updated_at]
        }) {
            affected_rows
      }
    }
  `;

  const variables = {
    userId: user.user_id,
    email: user.email,
  };

  const payload = {
    headers: {
      "content-type": "application/json",
      "x-hasura-admin-secret": configuration.ACCESS_KEY
    },
    url: `${configuration.BASE_URL}/v1/graphql`,
    body: JSON.stringify({ query, variables }),
  };

  request.post(payload, (error, response, body) => callback(error, user, context));
}
This piece of code works more or less as a Lambda function and simply sends a mutation to your Hasura backend to create or update a user’s table row using values from the Auth0 context.
You may have noticed that there are 2 variables that look awfully like environment variables:
configuration.BASE_URLconfiguration.ACCESS_KEY
In order to configure the correct values, go back to “Auth0 -> Rules” and scroll toward the bottom of the page until you find the “Settings” panel:
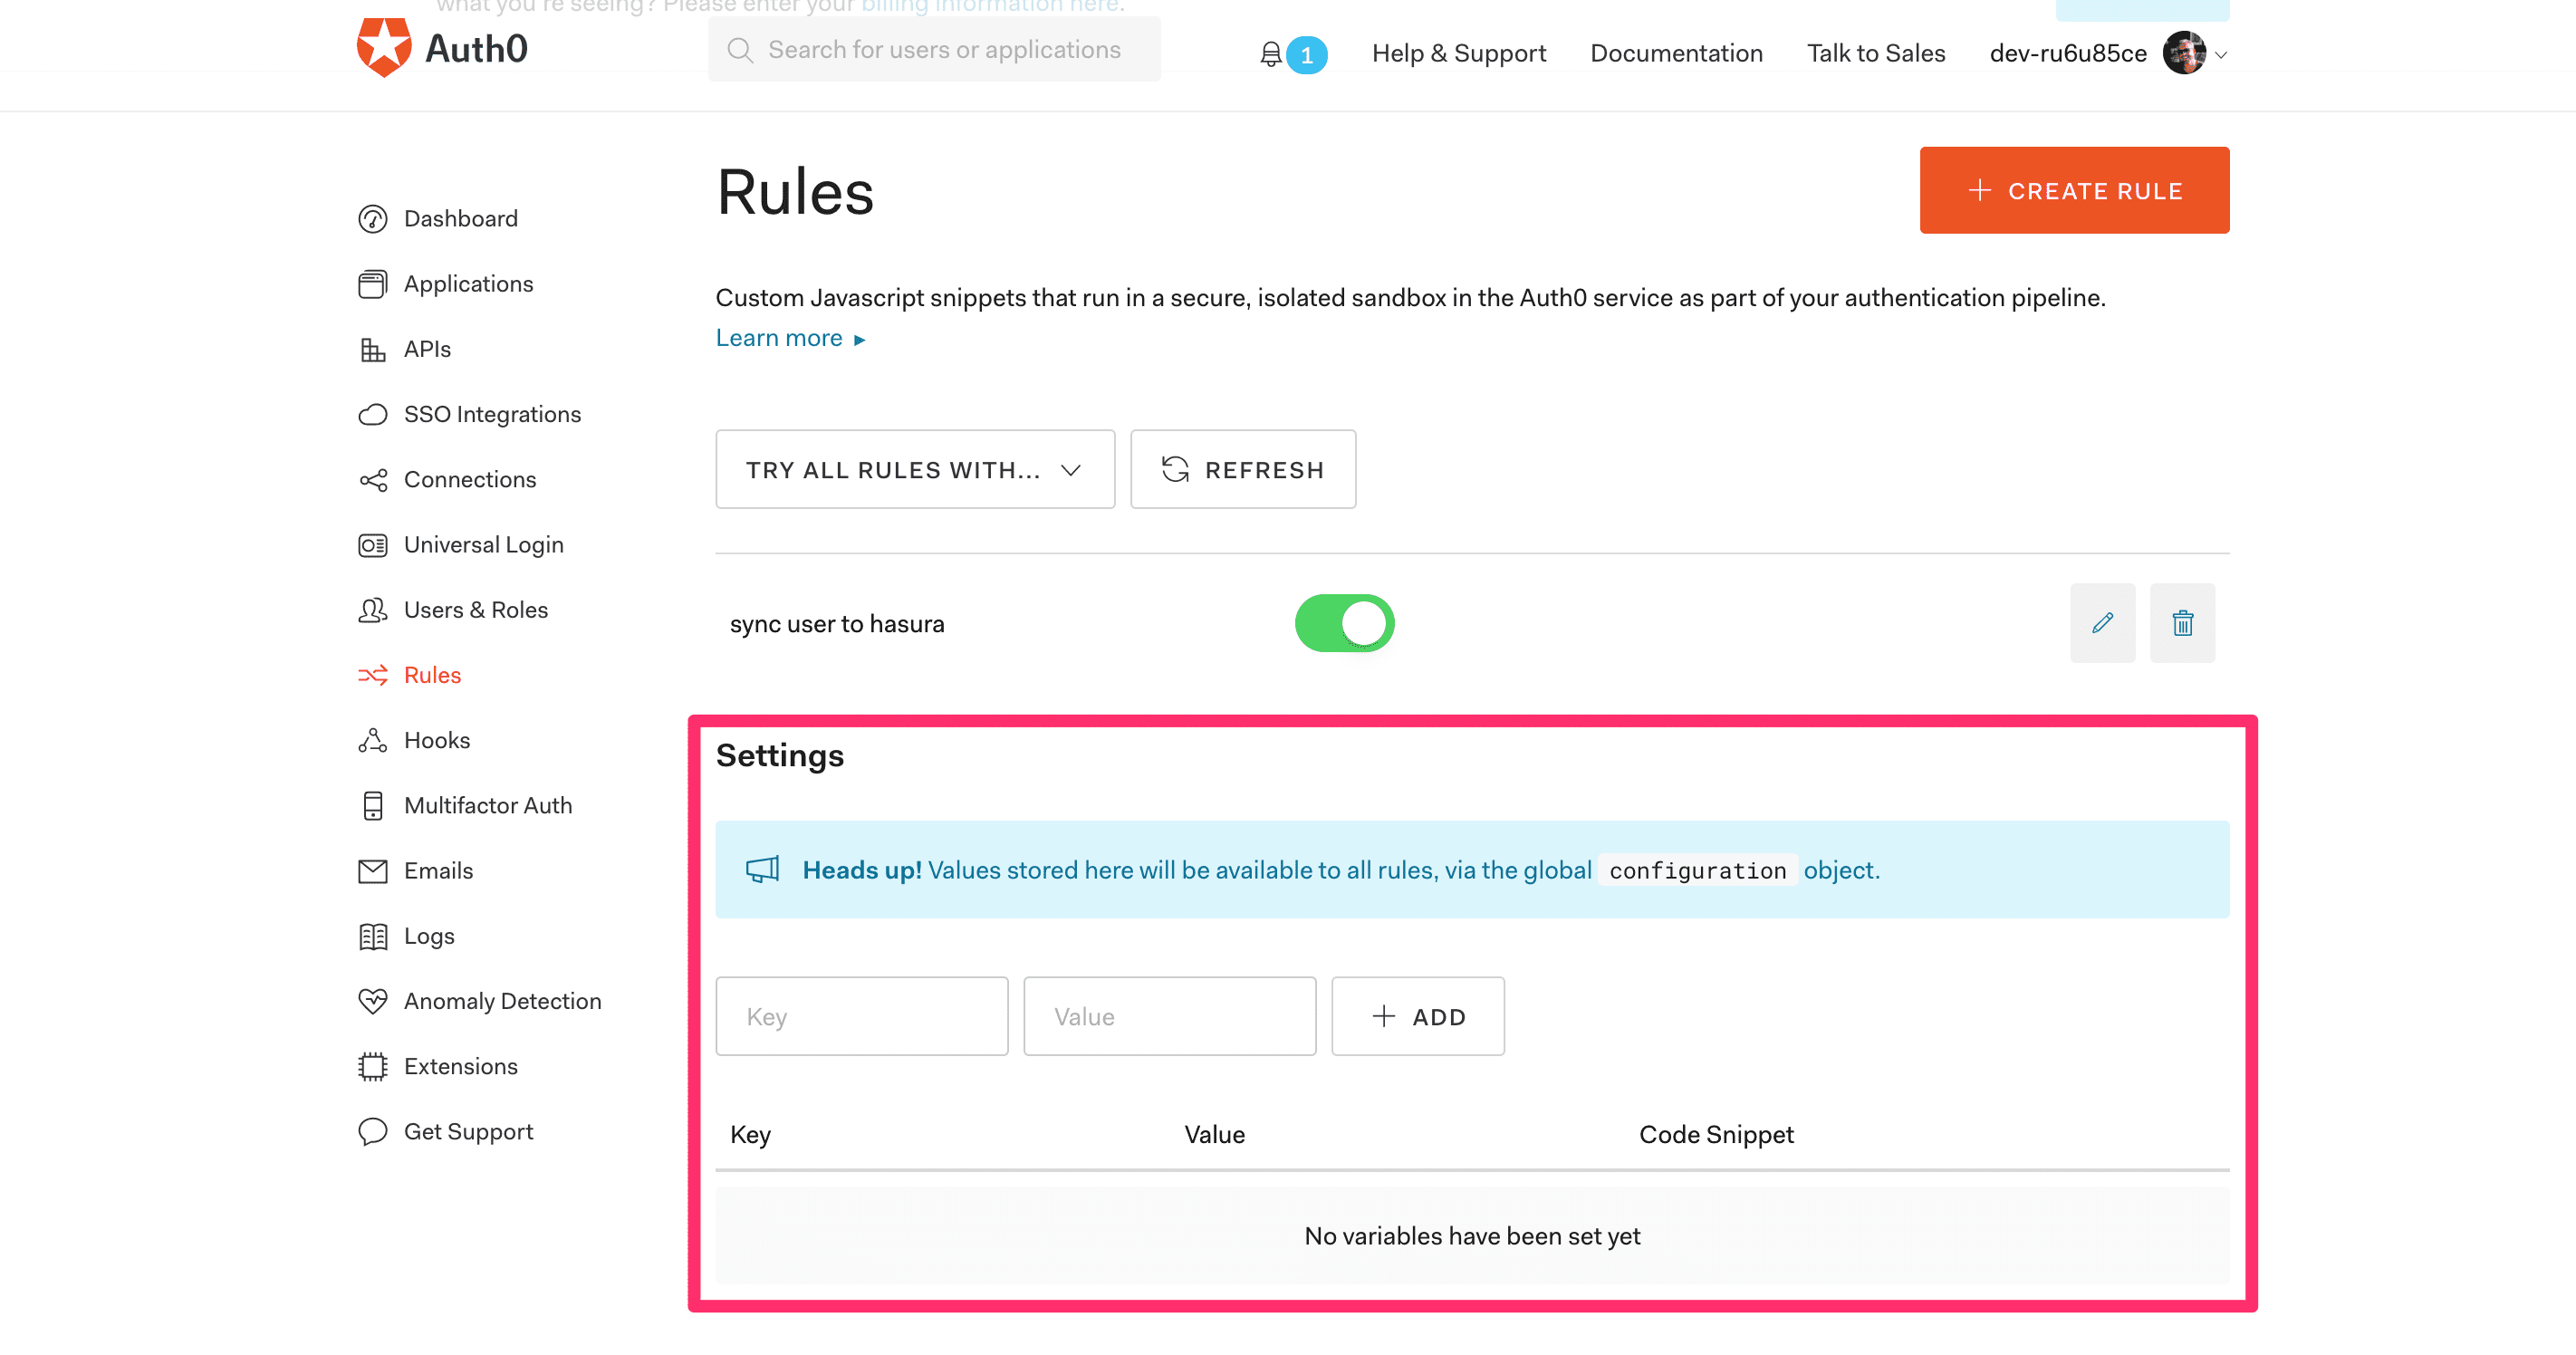
Now add your Hasura’s base URL (mine looks like this: https://hasura-article.herokuapp.com/) and secret, then you can go back into your rule and click on “TRY THIS RULE” at the bottom of the page.
If everything goes as planned, you should be able to see a new users table line:
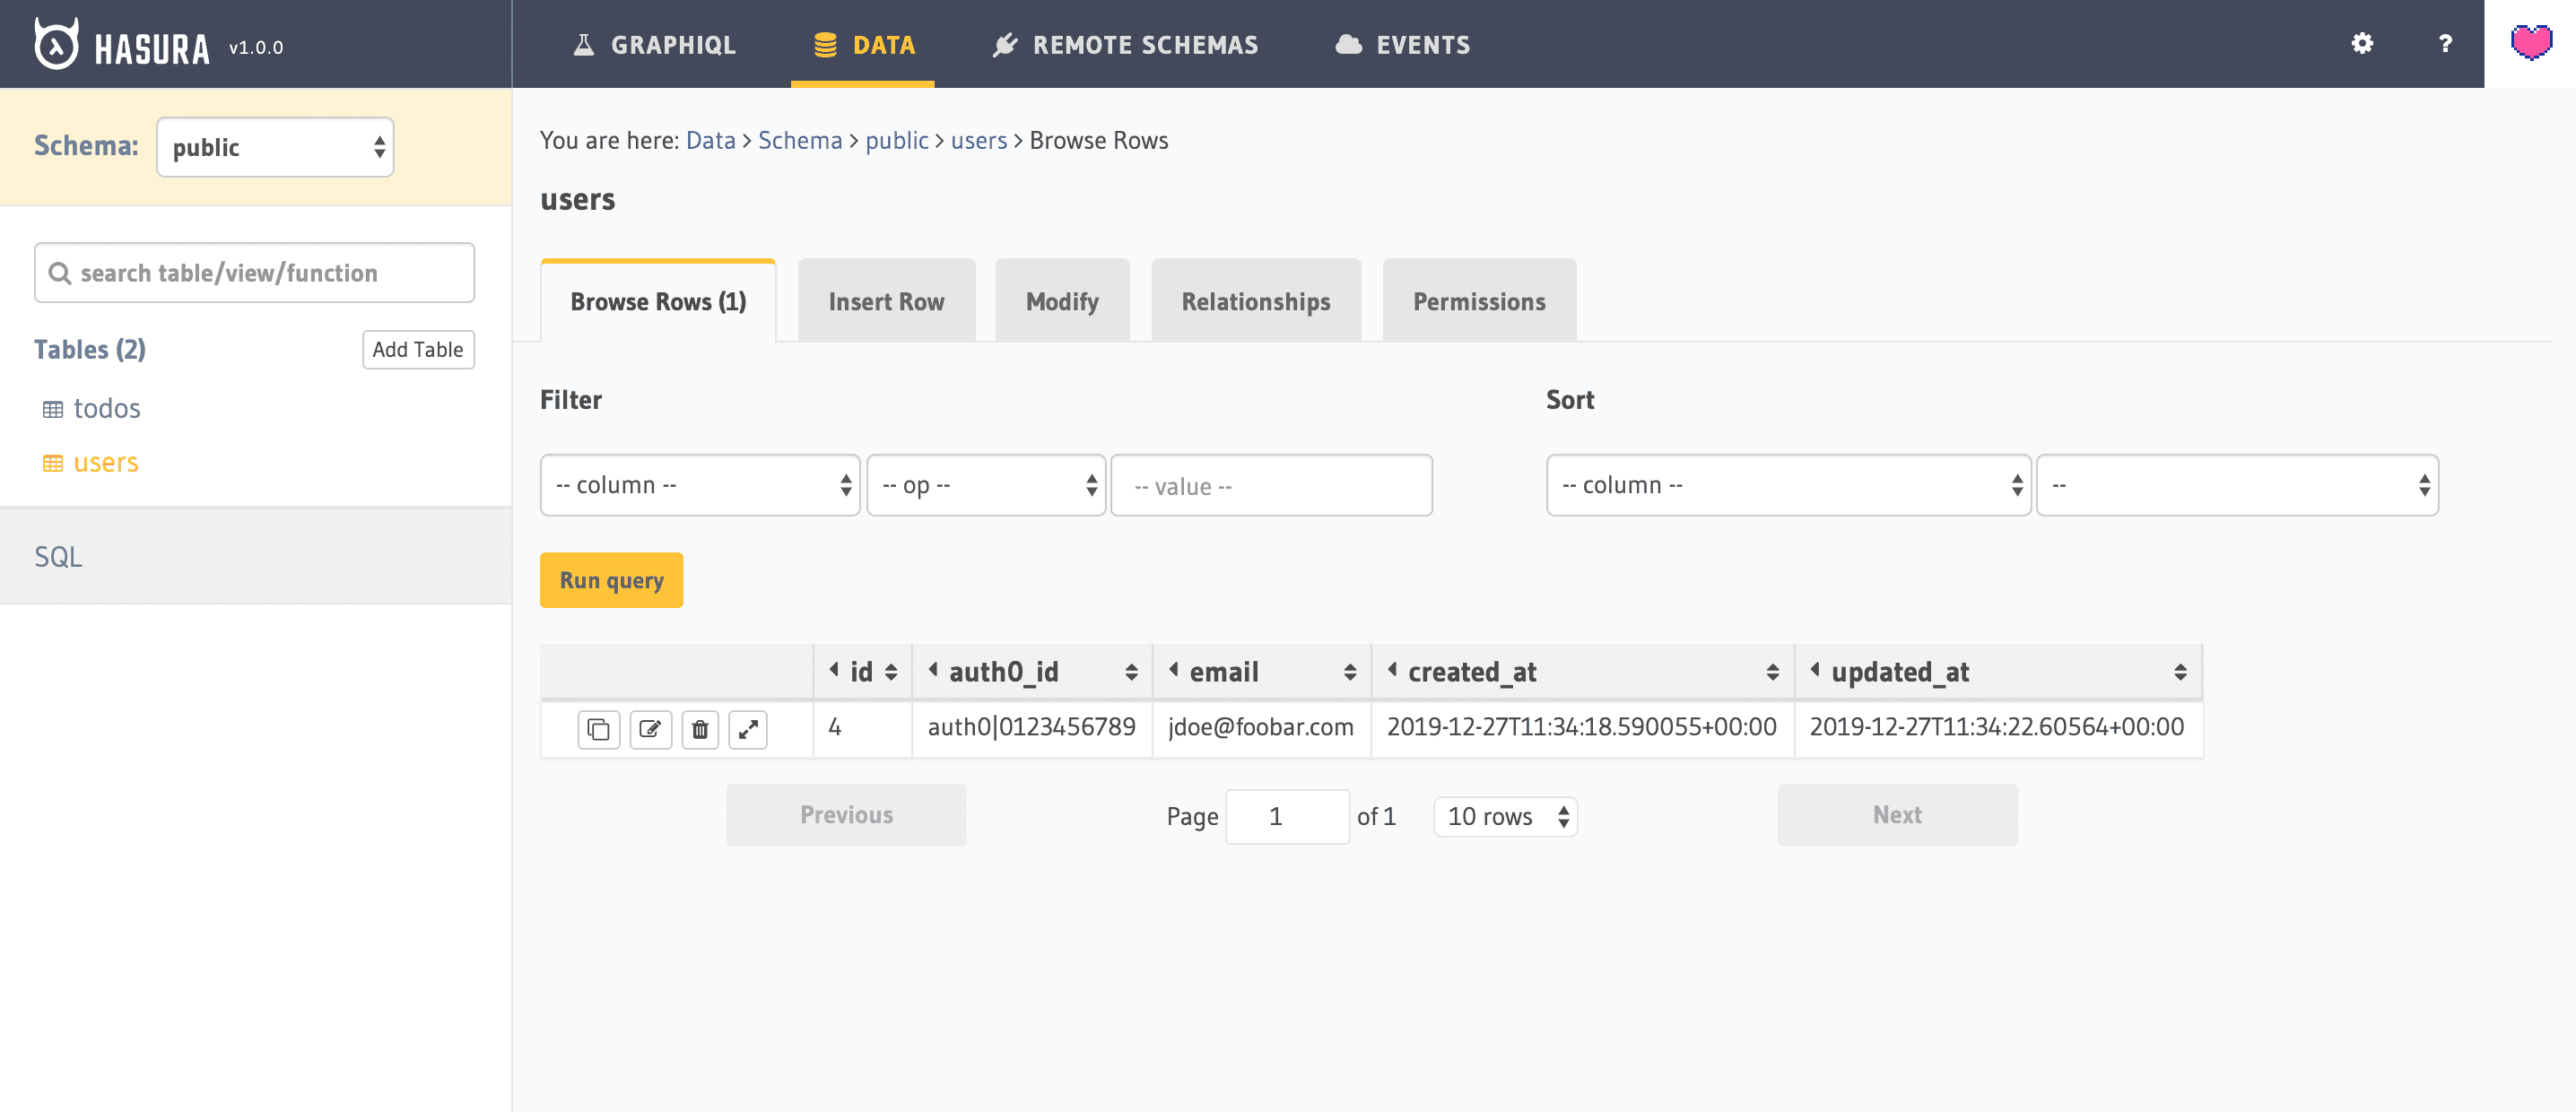
With this rule in place, you should be able to pick up your local React App, log in again (or just refresh the page), and then refresh the Hasura’s users table and see you logged in user successfully stored in there!
Configure Auth0 to generate an Hasura compatible JWT
So far you can log in / log out using a locally developed React app and you can store your user’s data into your Hasura’s backend users table. The next step is to use the login credentials to perform some user-scoped queries from the React App.
By all means, if you log in as “Peter” you should see Peter’s todos.
This operation requires you to operate in multiple areas:
- Configure an Auth0 rule so to generate Hasura compatible JWT claims
- Use an Auth0 API to force the JWT Auth Token
- Configure Hasura to validate Auth0 generated JWTs
Step 1 - Add Hasura’s JWT claims
Let’s create a new generic rule from “Auth0 -> Rules”, name it “Hasura JWT claim” and paste this code:
function hasuraClaimsRule (user, context, callback) {
  const query = `
		query getUserId ($auth0Id:String!) {
			users(where: { auth0_id: { _eq: $auth0Id }}) { id }
    }
  `;

  const variables = {
    auth0Id: user.user_id,
  };

  const payload = {
    headers: {
      "content-type": "application/json",
      "x-hasura-admin-secret": configuration.ACCESS_KEY
    },
    url: `${configuration.BASE_URL}/v1/graphql`,
    body: JSON.stringify({ query, variables })
  };

  request.post(payload, (error, response, body) => {
    if (error) {
      callback(error);
      return;
    }

    try {
      context.accessToken['https://hasura.io/jwt/claims'] = {
        "x-hasura-default-role": "user",
        "x-hasura-allowed-roles": ["user"],
        "x-hasura-user-id": JSON.parse(body).data.users[0].id.toString(),
        "x-auth0-user-id": user.user_id,
      };

      callback(null, user, context);
    } catch (err) {
      callback(err);
    }
  });
}
Once you try this rule, it will use Auth0’s user identifier to retrieve Hasura’s internal user_id and store it into the JWT claims. You should be able to see a log like this one:
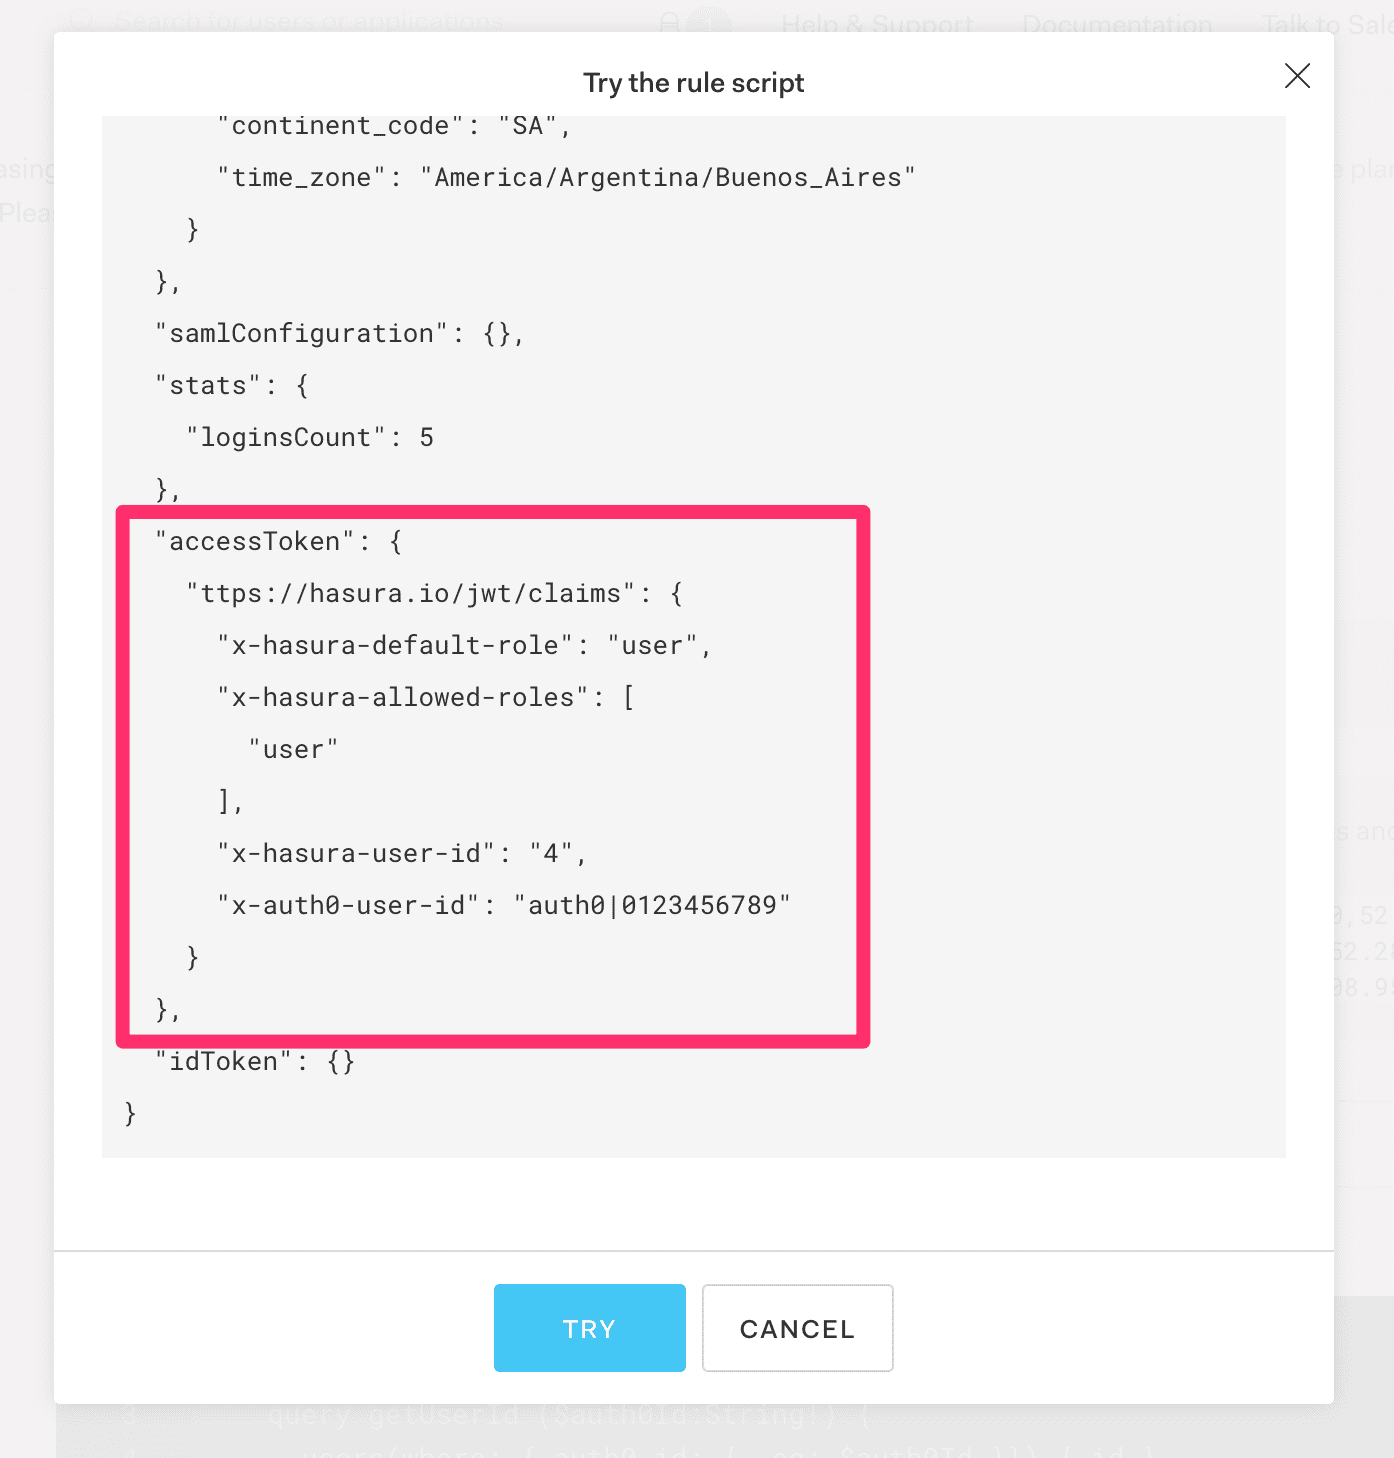
This rule is very important as you want to establish all your internal data relations using simple integers to improve performances, also, you don’t really want to spread the long Auth0 id as a foreign key all over your database!
Step 2 - Use a custom API
Now we are going to address a special SPA Application issue:
Where in hell should we store the JWT token?
Luckily, Auth0 SDK provides a simple solution:
do not store it.
The SDK comes prepared with a utility function client.getTokenSilently() that will give you access to the original access_token. The problem is that by default Auth0 will not hand out a JWT, and this is the point where it gets very confusing with the available documentation!
The solution is quite simple.
Add an audience claim to Auth0Provider in src/index.js:
...
ReactDOM.render(
  <Auth0Provider
    domain={config.domain}
    client_id={config.clientId}
    audience={'https://dev-ru6u85ce.eu.auth0.com/api/v2/'}
    ...
The value comes from the “Auth0 -> APIs” page, and you can simply copy the “API Audience” value of the default API.
NOTE: There is so much more stuff to do with Auth0’s APIs, but that deserves its own tutorial! Today let’s just scratch the surface with the default API.
With the audience set up, you can now create a src/components/Todos.js the component that will attempt to load the todos that belong to the authenticated user:
import React, { useEffect, useState } from 'react';
import { useAuth0 } from "../react-auth0-spa";

const Todos = () => {
  const { isAuthenticated, getTokenSilently } = useAuth0();
  const [todos, setTodos] = useState([]);

  useEffect(() => {
    const loadTodos = async () => {
      const token = await getTokenSilently();
      const body = await (await fetch('https://hasura-article.herokuapp.com/v1/graphql', {
        method: 'POST',
        headers: {
          'Content-Type': 'application/json',
          'Authorization': `Bearer ${token}`,
        },
        body: JSON.stringify({ query: 'query { todos { id, text }}' }),
      })).json();

      if (body.errors) {
        console.error(body.errors[0].message)
      } else {
        setTodos(body.data.todos)
      }
    }

    isAuthenticated && loadTodos()
  }, [isAuthenticated, getTokenSilently])

  return (
    <ul>
      {todos.map(todo => (
        <li key={todo.id}>{todo.text}</li>
      ))}
    </ul>
  )
};

export default Todos;
But if you add this to your src/App.js it will console.error “invalid x-hasura-admin-secret/x-hasura-access-key” because we haven’t yet set up Hasura so to be able to verify the JWT produced by Auth0. That is the next step.
Step 3 - Configure Hasura to validate Auth0 generated JWTs
In this step, you are going to generate a piece of Hasura configuration that will enable the JWT Authentication.
First, go to https://hasura.io/jwt-config, select “Auth0” provider and paste the “domain name” as in src/auth_config.json (or you can copy it from your “Auth0 -> Apps -> Default App -> Settings”).
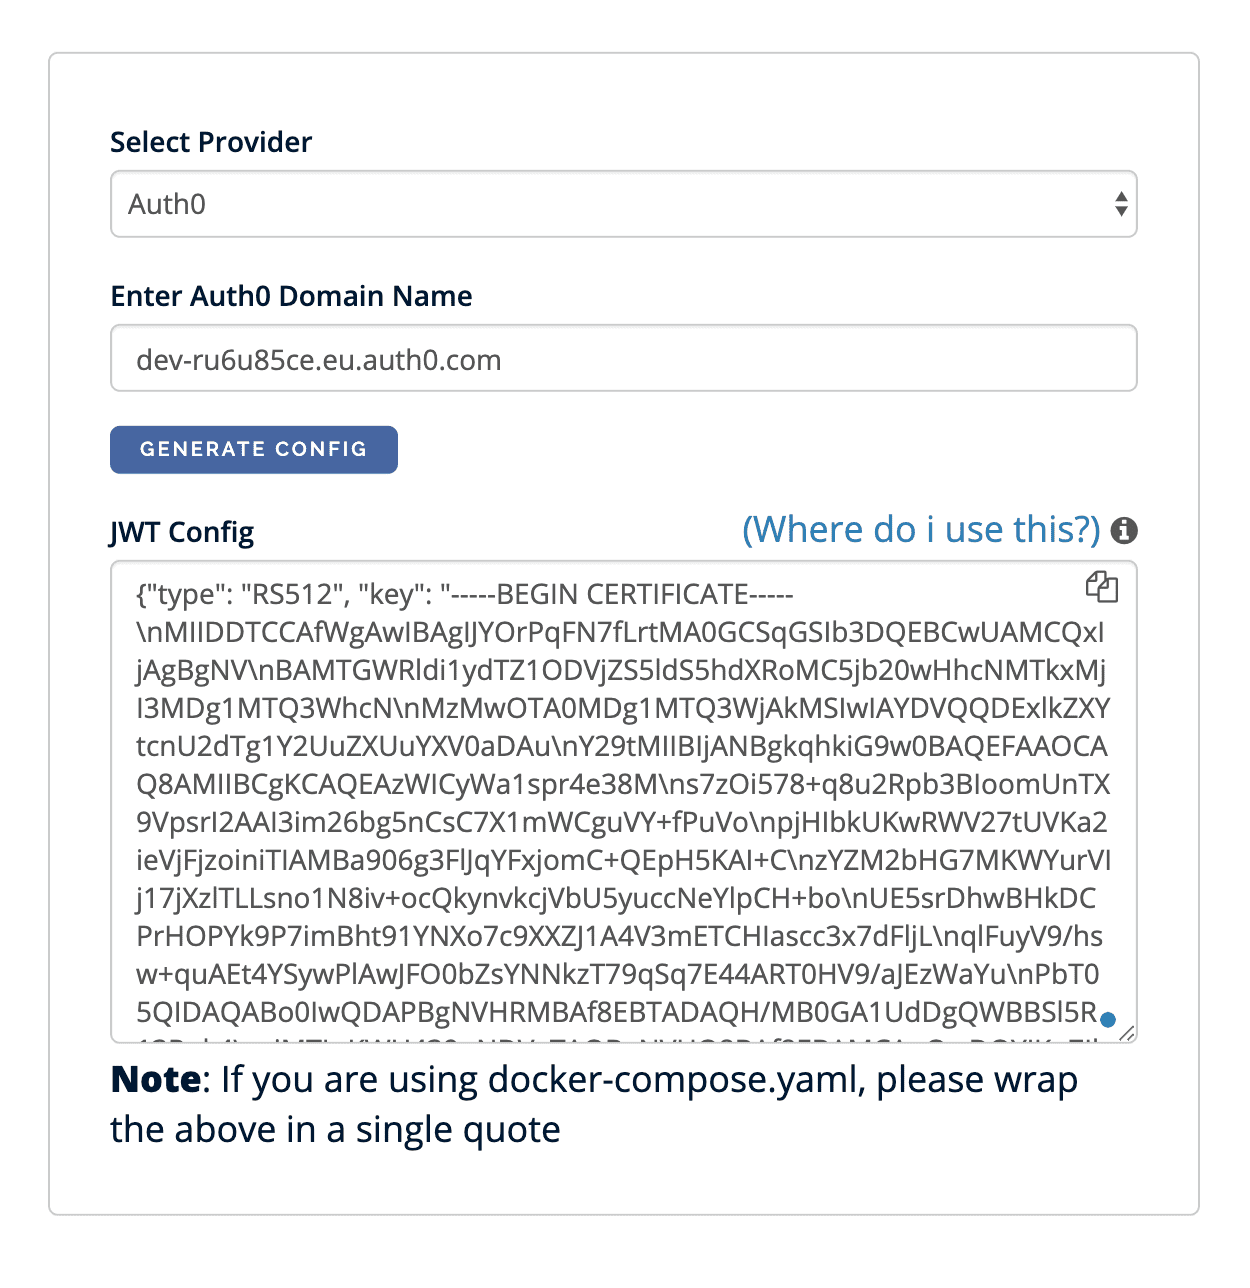
Now copy the generated configuration and navigate to “Heroku -> Application -> Settings” and add a new config variable HASURA_GRAPHQL_JWT_SECRET to which you apply that huge config value.
In a few seconds, possibly a minute, your Hasura backend will be up and running with the new configuration, and your todos will be visible in the client app, just make sure that you manually insert a few todos with the correct user_id.
Conclusions
This tutorial covers the basics of integrating Hasura, Auth0, and a React SPA.
From this starting point, you should be able to use tools like Apollo Client to build the data layer of your frontend App.